目录
可随意转载Update2024.01.31
前言
LoRA(Low-Rank Adaptation)是一种先进的大模型调优技术,来自LLM领域(比如:GPT3)。最早在stable diffusion中引入Lora技术的大神叫cloneofsimo(GitHub – cloneofsimo/lora) 。Lora for stable diffusion算法属于跨模态大模型算法,综合了NLP,GAN,DM三个领域的成果,下面就让我们详细来了解它。
一、Diffusion Model算法发展历程
1.1 Pivotal Tuning(PTI)算法
PTI算法是GAN领域的算法(后被引入DM领域),来自Daniel Roich 2021年论文《Pivotal Tuning for Latent-based Editing of Real Images》
它论证了在 GAN inversion任务中,即使是SOTA的StyleGAN2-ada算法在out domain 中也面临失真(distortion)和可编辑(editable)的妥协(tradeoff)。得出了必须妥协的根本原因(越接近W域越保真,越接近W+域越可编辑)。提出了概念“关键微调”(PTI):用PTI修改G网络在W空间中找到更高密度(density)的编辑向量,使得任务结果更好。
从这篇论文看出GAN系列算法理论上已经到了能力天花板,无论再怎么改进在out domain问题上只能做tradeoff,这时DM(Diffusion Model)横空出世了!
DM算法最早来自2015年论文《Deep unsupervised learning using nonequilibrium thermodynamics》,文章标题很拗口,果不其然就淹没在海量论文中。2020年算法DDPM,来自自论文《Denoising Diffusion Probabilistic Models》,把DM算法真正炒火了。
1.2 DDPM算法
1.2.1 DDPM算法
给定训练图片数据集(目标),逐步加高斯噪声,训练一个unet:最小化输入噪声(算法动态加权)和unet输出噪声(Z飘)的L1 loss或者L2 loss。DDPM的模型训练就这么简短。
不同于GAN算法,它的去噪(denoising)过程其实是预测(生成)过程,并不是训练过程。
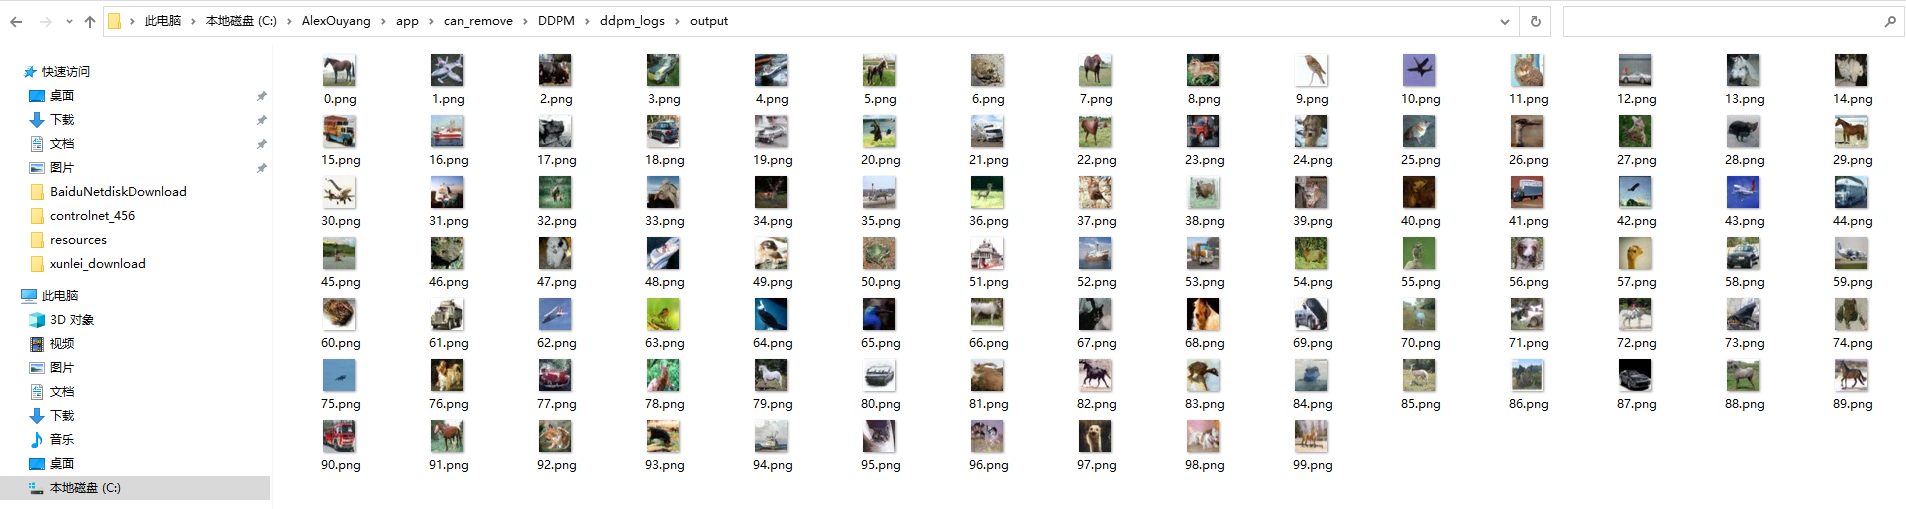
在CIFAR-10数据集上训练252,000轮后,预测(生成)效果如下:
这份开源代码不仅仅复现了DDPM论文的内容,还借鉴了部分openai论文《Improved Denoising Diffusion Probabilistic Models》(官方代码地址)的代码,把加噪(增强)过程β由线性改成了cosine曲线:
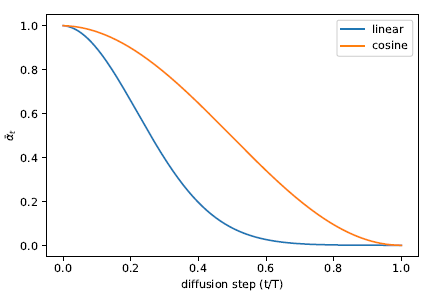
注意:《Improved Denoising Diffusion Probabilistic Models》这篇论文很重要,LDM系列算法用到了openai这篇论文的代码。
1.2.2 代码示例
加噪代码(训练模型)
    #加噪
    def forward(self, x, y=None):
        ...
        t = torch.randint(0, self.num_timesteps, (b,), device=device)
        return self.get_losses(x, t, y)
def get_losses(self, x, t, y):
# 标准高斯噪声
noise = torch.randn_like(x)
# 第t步的噪声强度
perturbed_x = self.perturb_x(x, t, noise)
# 输入unet估计Z飘
estimated_noise = self.model(perturbed_x, t, y)
# 比较Z飘和输入噪声的loss
if self.loss_type == "l1":
loss = F.l1_loss(estimated_noise, noise)
elif self.loss_type == "l2":
loss = F.mse_loss(estimated_noise, noise)
return loss去噪(sample)代码(生成)
    # 模型已经在去噪代码中生成好了,所以不需要反向计算了
    @torch.no_grad()
    def sample(self, batch_size, device, y=None, use_ema=True):
        ...
        # 高斯噪声
        x = torch.randn(batch_size, self.img_channels, *self.img_size, device=device)
        # 迭代timesteps步执行去噪
        for t in range(self.num_timesteps - 1, -1, -1):
            t_batch = torch.tensor([t], device=device).repeat(batch_size)
            x = self.remove_noise(x, t_batch, y, use_ema)

            # 除非是最后一步,否则都要加上扰动项
            if t > 0:
                x += extract(self.sigma, t_batch, x.shape) * torch.randn_like(x)
        return x.cpu().detach()
@torch.no_grad()
def remove_noise(self, x, t, y, use_ema=True):
...
# 使用unet估计噪声Z飘,然后从x中减掉它(加权后)
return (
(x - extract(self.remove_noise_coeff, t, x.shape) * self.model(x, t, y)) *
extract(self.reciprocal_sqrt_alphas, t, x.shape)
)从上面可以看出DDPM算法有个很大的问题,他的采样(生成)过程需要上千步迭代,速度很慢,因此DDIM算法应运而生!
1.3 DDIM采样算法
根据DDPM的计算公式,宋飏在论文《Denoising Diffusion Implicit Models》中推导出更一般化(generalized)的数学公式,去除了DDPM对马尔科夫链的路径依赖。去噪(denoising)过程可以减少步骤,大大加速。
并且在设置σ=0时,还可以得到确定性的去噪过程,这就为隐空间(Latent)上做条件生成提供了极好的理论基础。
DDIM采样算法的创新点在文件:functions/denoising.py的generalized_steps函数中定义。
1.4 Latent Diffusion Model(LDM)算法
LDM来自Robin Rombach2022年论文《High-Resolution Image Synthesis with Latent Diffusion Models》,是一种开源的、实用的扩散模型算法。
它解决的问题是:高分辨率的图片如何快速生成出来?扩散模型如何实用?
一般的方法是先下采样,然后再输入模型计算,再上采样回来;或者直接用大算力直接在高分辨率上强算。前一种效果不佳,后一种算力吃不消。
作者分析autoencoder做图片压缩算法细节后发现:压缩存在2个阶段: perceptual compression 和semantic compression。 Perceptual compression 压缩掉细节(高频)部分,并不影响最终结果,所以作者引入了autoencoder模块把高分辨率大图先编码到一个隐空间z(latent space),然后再执行LDM算法,中间加入一些条件生成,最后从隐空间解码出生成图(大大加速了)。如下图(简化自论文原图)所示:
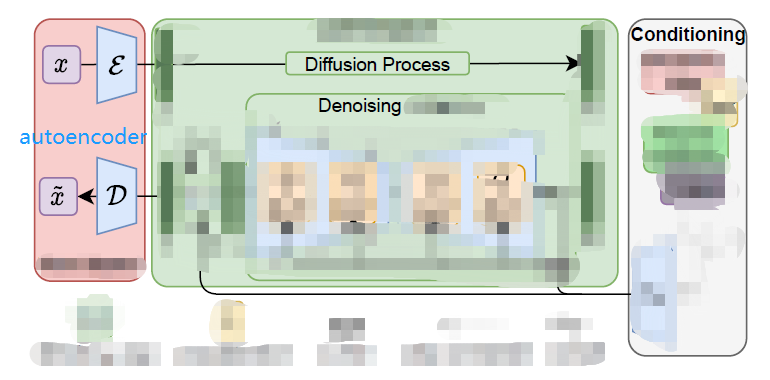
- 红色部分是pre-trained autoencoder,包含编码器和对应的解码器(第一阶段)
- 中间绿色部分是LDM(第二阶段)输入为小尺寸隐变量z,扩散到zT,然后再去噪回z’
- 浅绿色(右)部分就是各种条件生成(text2image、image2image、layout2image、SR、impainting),
- 论文也做了小创新,比如在Unet上叠加cross-attention
Latent Diffusion Model结构
- autoencoder(VAE)
- U-Net
- text-encoder(CLIP text encoder)
LDM包含多种类型预训练模型:无条件图片生成、class条件图片生成(ImageNet数据集)、文本条件图片生成(Conceptual Captions数据集)、超分、布局条件图片生成、语义分割图片生成。
Stable Diffusion是基于LAION-5B图文数据集训练的模型(类型:文本条件图片生成),其中text encoder是冻参的CLIP ViT-L/14模型,由CompVis训练的模型包括v1.1 ~ v1.4。所有stable diffusion模型都无训练代码。
Stable Diffusion(SD)预训练模型
SD是Stability-AI公司赞助的,基于文本条件图片生成配置的,LDM+text encoder(1.x采用算法CLIP ViT-L/14;2.x采用算法OpenCLIP-ViT/H)组合算法的预训练模型。
它是开源的耗费资金最多、参数量最多、最流行的预训练模型。因为google和openai都没放出预训练模型,所以第三方模型都是在它之上做的微调。
各版本关系如下:
sd-v1-4.ckpt以下的版本来自仓库CompVis/stable-diffusion 。
sd-v1-5.ckpt版本来自仓库runwayml/stable-diffusion
v2.x版本来自仓库Stability-AI/stablediffusion
基于sd的显性生成控制(img2img)概述
基于sd的隐性生成控制(img2img)概述
1.5 Textual Inversion算法
Textual Inversion技术来自Rinon Gal 2022年论文《An Image is Worth One Word: Personalizing Text-to-Image Generation using Textual Inversion》,把PTI应用到Diffusion领域。
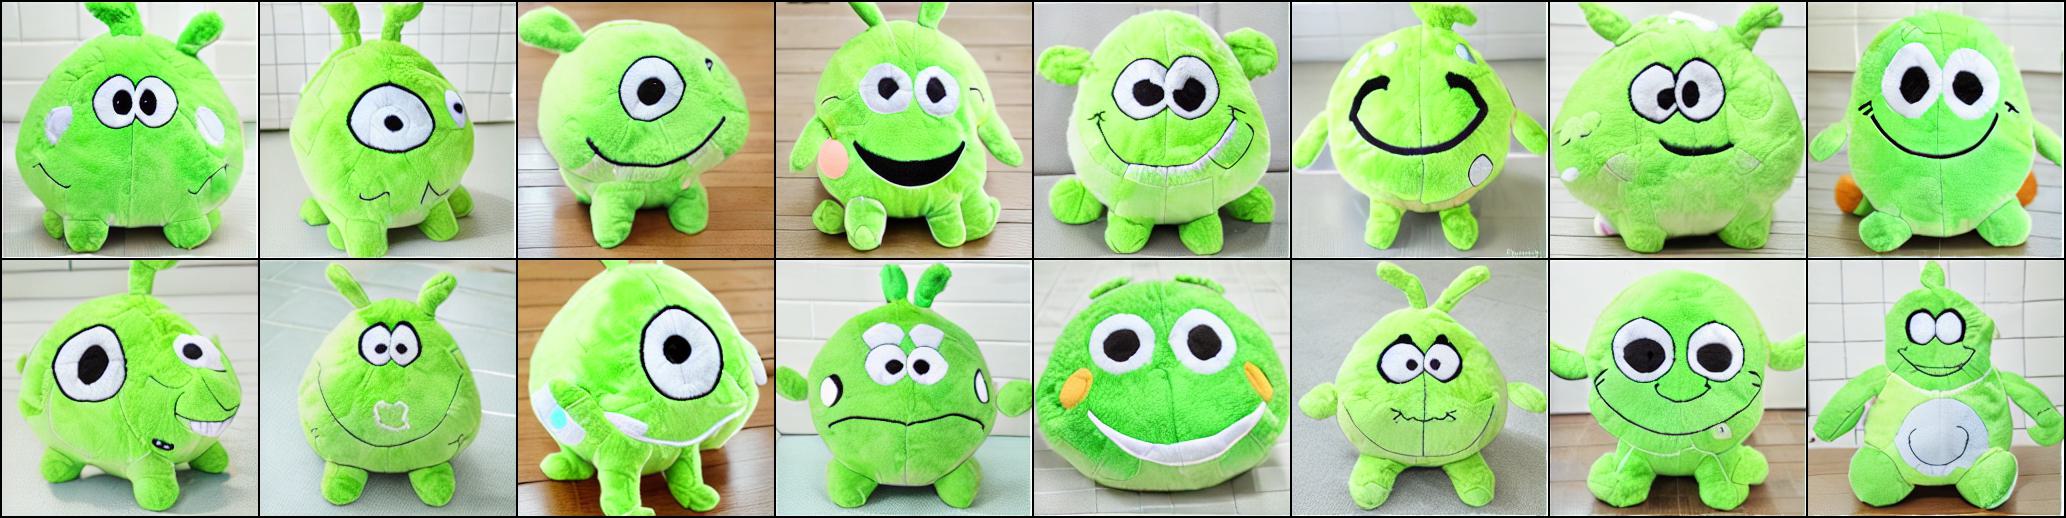
用特殊提示词(prompt)定义某个新概念S*,用NLP转换成embedding tensor,输入3-5张新概念S的图,用SD模型和NLP把概念S*和embedding tensor关联,通过特殊提示词(prompt)描述新概念S*( 比如: a photo of * ),LDM模型可以生成概念S*的新图。
使用1688.com上某个青蛙玩偶为模板,生成效果如下:
1.6 DreamBooth算法
Dreambooth来自Google公司论文《DreamBooth: Fine Tuning Text-to-Image Diffusion Models for Subject-Driven Generation》,可以事先准备一些人/物体的图片。用一个普通词代替图片表示的概念(concept),然后使用这个普通词将概念(concept)表示的人/物体生成出来。使用prior-preservation区别普通词表示的同类物体,达到比TI更精确的目标生成。
DreamBooth论文没开源,芝加哥大学的大神Xavier基于Textual Inversion源代码,复现了dreambooth论文,开源了项目DreamBooth for Stable Diffusion 。
感谢大神 Rinon Gal 和Xavier对开源社区无私、伟大的贡献。
1.7 LoRA技术
LoRA是一种大模型finetune技巧,可以大大加快上述算法的速度并减少DreamBooth模型的尺寸。diffusers库实现lora技术的关键代码如下:
class LoRAAttnProcessor(nn.Module):
    def __init__(self, hidden_size, cross_attention_dim=None, rank=4):
        super().__init__()

        self.hidden_size = hidden_size
        self.cross_attention_dim = cross_attention_dim
        self.rank = rank

        self.to_q_lora = LoRALinearLayer(hidden_size, hidden_size, rank)
        self.to_k_lora = LoRALinearLayer(cross_attention_dim or hidden_size, hidden_size, rank)
        self.to_v_lora = LoRALinearLayer(cross_attention_dim or hidden_size, hidden_size, rank)
        self.to_out_lora = LoRALinearLayer(hidden_size, hidden_size, rank)

    def __call__(self, attn: Attention, hidden_states, encoder_hidden_states=None, attention_mask=None, scale=1.0):
        residual = hidden_states

        input_ndim = hidden_states.ndim

        if input_ndim == 4:
            batch_size, channel, height, width = hidden_states.shape
            hidden_states = hidden_states.view(batch_size, channel, height * width).transpose(1, 2)

        batch_size, sequence_length, _ = (
            hidden_states.shape if encoder_hidden_states is None else encoder_hidden_states.shape
        )
        attention_mask = attn.prepare_attention_mask(attention_mask, sequence_length, batch_size)

        if attn.group_norm is not None:
            hidden_states = attn.group_norm(hidden_states.transpose(1, 2)).transpose(1, 2)

        query = attn.to_q(hidden_states) + scale * self.to_q_lora(hidden_states)
        query = attn.head_to_batch_dim(query)

        if encoder_hidden_states is None:
            encoder_hidden_states = hidden_states
        elif attn.norm_cross:
            encoder_hidden_states = attn.norm_encoder_hidden_states(encoder_hidden_states)

        key = attn.to_k(encoder_hidden_states) + scale * self.to_k_lora(encoder_hidden_states)
        value = attn.to_v(encoder_hidden_states) + scale * self.to_v_lora(encoder_hidden_states)

        key = attn.head_to_batch_dim(key)
        value = attn.head_to_batch_dim(value)

        attention_probs = attn.get_attention_scores(query, key, attention_mask)
        hidden_states = torch.bmm(attention_probs, value)
        hidden_states = attn.batch_to_head_dim(hidden_states)

        # linear proj
        hidden_states = attn.to_out[0](hidden_states) + scale * self.to_out_lora(hidden_states)
        # dropout
        hidden_states = attn.to_out[1](hidden_states)

        if input_ndim == 4:
            hidden_states = hidden_states.transpose(-1, -2).reshape(batch_size, channel, height, width)

        if attn.residual_connection:
            hidden_states = hidden_states + residual

        hidden_states = hidden_states / attn.rescale_output_factor

        return hidden_states
二、源代码分析与理解
LDM(stable diffusion)等代码库源码来自lucidrains的代码和openai的代码。
注:lucidrains这个人名是不是很熟悉? 没错,他是之前介绍过的流行算法库StyleGAN2-pytorch的作者。
DreamBooth on stable diffusion(简称D库)是在Textual Inversion(简称T库)源码上分支出来,而Textual Inversion又是从latent diffusion(L库)分支出来的,我们对比它们的源码以增强对算法的理解。
2.1 Textual Inversion与latent diffusion代码比较
2.1.1 T库入口函数main.py修改
1. 增加以下输入参数:
    parser.add_argument(
        "--datadir_in_name",
        type=str2bool,
        nargs="?",
        const=True,
        default=True,
        help="Prepend the final directory in the data_root to the output directory name")

    parser.add_argument("--actual_resume",
        type=str,
        required=True,
        help="Path to model to actually resume from")

    # 增加了训练图片的路径
    parser.add_argument("--data_root",
        type=str,
        required=True,
        help="Path to directory with training images")

    parser.add_argument("--embedding_manager_ckpt",
        type=str,
        default="",
        help="Initialize embedding manager from a checkpoint")

    parser.add_argument("--placeholder_string",
        type=str,
        help="Placeholder string which will be used to denote the concept in future prompts. Overwrites the config options.")

    parser.add_argument("--init_word",
        type=str,
        help="Word to use as source for initial token embedding")
2. 增加了对上面4个输入参数的处理 :
        config.model.params.personalization_config.params.embedding_manager_ckpt = opt.embedding_manager_ckpt
        if opt.placeholder_string:
            config.model.params.personalization_config.params.placeholder_strings = [opt.placeholder_string]

        if opt.init_word:
            config.model.params.personalization_config.params.initializer_words[0] = opt.init_word
        # data
        config.data.params.train.params.data_root = opt.data_root
        config.data.params.validation.params.data_root = opt.data_root
2.1.2 T库算法ddpm.py修改

1.增加了代码加载模型embedding_manager_ckpt
    def instantiate_embedding_manager(self, config, embedder):
        model = instantiate_from_config(config, embedder=embedder)

        if config.params.get("embedding_manager_ckpt", None): # do not load if missing OR empty string
            model.load(config.params.embedding_manager_ckpt)

        return model
2. 在__init__方法中增加上面函数的加载代码
        self.embedding_manager = self.instantiate_embedding_manager(personalization_config, self.cond_stage_model)

        # 设置为需要训练
        for param in self.embedding_manager.embedding_parameters():
            param.requires_grad = True
2.1.3 总结T库的代码逻辑
注意看配置文件txt2img-1p4B-finetune.yaml,先去加载LDM,然后LDM加载EmbeddingManager,然后BERTEmbedder利用PersonalizedBase加载CLIP论文中定义的图文编码(a photo of S*),最小化输入的新概念词(S*)和训练图片集的loss,经过训练让概念S*和训练图片集关联起来。这样在LDM做文生图的时候就可以直接输入S*生成对应训练集描述的新图片了。
2.2 DreamBooth on Stable Diffusion与 Textual Inversion代码比较
增加了图片正则化(reg),引入损失函数prior-preservation loss。比如:我想生成柯基狗,但是不想因为少量的训练图片影响全局(比如class_image中其他的特征:姿势、位置、其他物体),因此通过生成器生成100张随机的class_image并做联合训练,既能保证在prompt的时候能够生成想要的柯基狗,又不会过拟合训练图片。
2.2.1 main.py
1. 输入参数“placeholder_string”被重新命名为“class_word”。
    parser.add_argument("--placeholder_string",
        type=str,
        help="Placeholder string which will be used to denote the concept in future prompts. Overwrites the config options.")
    parser.add_argument("--class_word",
        type=str,
        default="dog",
        help="Placeholder token which will be used to denote the concept in future prompts")
2. “__main__”函数中personalization_config也不再使用了
config.model.params.personalization_config.params.embedding_manager_ckpt = opt.embedding_manager_ckpt
if opt.placeholder_string:
    config.model.params.personalization_config.params.placeholder_strings = [opt.placeholder_string]
if opt.init_word:
    config.model.params.personalization_config.params.initializer_words[0] = opt.init_word

        config.data.params.train.params.placeholder_token = opt.class_word
        config.data.params.reg.params.placeholder_token = opt.class_word
        config.data.params.validation.params.placeholder_token = opt.class_word
3.D库增加了一个类
class ConcatDataset(Dataset):
    def __init__(self, *datasets):
        self.datasets = datasets

    def __getitem__(self, idx):
        return tuple(d[idx] for d in self.datasets)

    def __len__(self):
        return min(len(d) for d in self.datasets)
4.D库增加下面一行
config.data.params.reg.params.data_root = opt.reg_data_root2.2.2 configs\stable-diffusion\v1-finetune_unfrozen.yaml
配置v1-finetune_unfrozen.yaml中废掉了personalization_config配置项,增加了reg配置项。
    personalization_config:
      target: ldm.modules.embedding_manager.EmbeddingManager
      params:
        placeholder_strings: ["*"]
        initializer_words: ["sculpture"]
        per_image_tokens: false
        num_vectors_per_token: 1
        progressive_words: False
    reg:
      target: ldm.data.personalized.PersonalizedBase
      params:
        size: 512
        set: train
        reg: true
        per_image_tokens: false
        repeats: 10
2.2.3 ldm\models\diffusion\ddpm.py
ddpm.py中废掉了embedding_manager
        self.embedding_manager = self.instantiate_embedding_manager(personalization_config, self.cond_stage_model)

        for param in self.embedding_manager.embedding_parameters():
            param.requires_grad = True
        self.embedding_manager = None
三、LoRa for Stable Diffusion源码理解
大神cloneofsimo(GitHub – cloneofsimo/lora) 利用了huggingface的基础模块transformers和diffusers库,借鉴了LoRa在LLM领域的成功经验,创造性创建了Lora for stable diffusion库。代码库中包含了textual inversion、dreambooth、LoRA等多种算法。
1.1 setup.py
定义了四个程序的主入口:
- lora_add: 合并2个lora模型
- lora_pti:用lora和PTI训练基于LDM或者textual inversion DM的LoRa小模型,对应的源代码是cli_lora_pti.py
- lora_distill:模型蒸馏
- lora_ppim:处理图片生成mask和text
以cli开头是因为作者用了Fire库,把python程序转换成了命令行程序。
1.2 cli_lora_pti.py
cli_lora_pti.py 代码是训练Textual Inversion的,不是训练dreambooth,训练流程图如下:
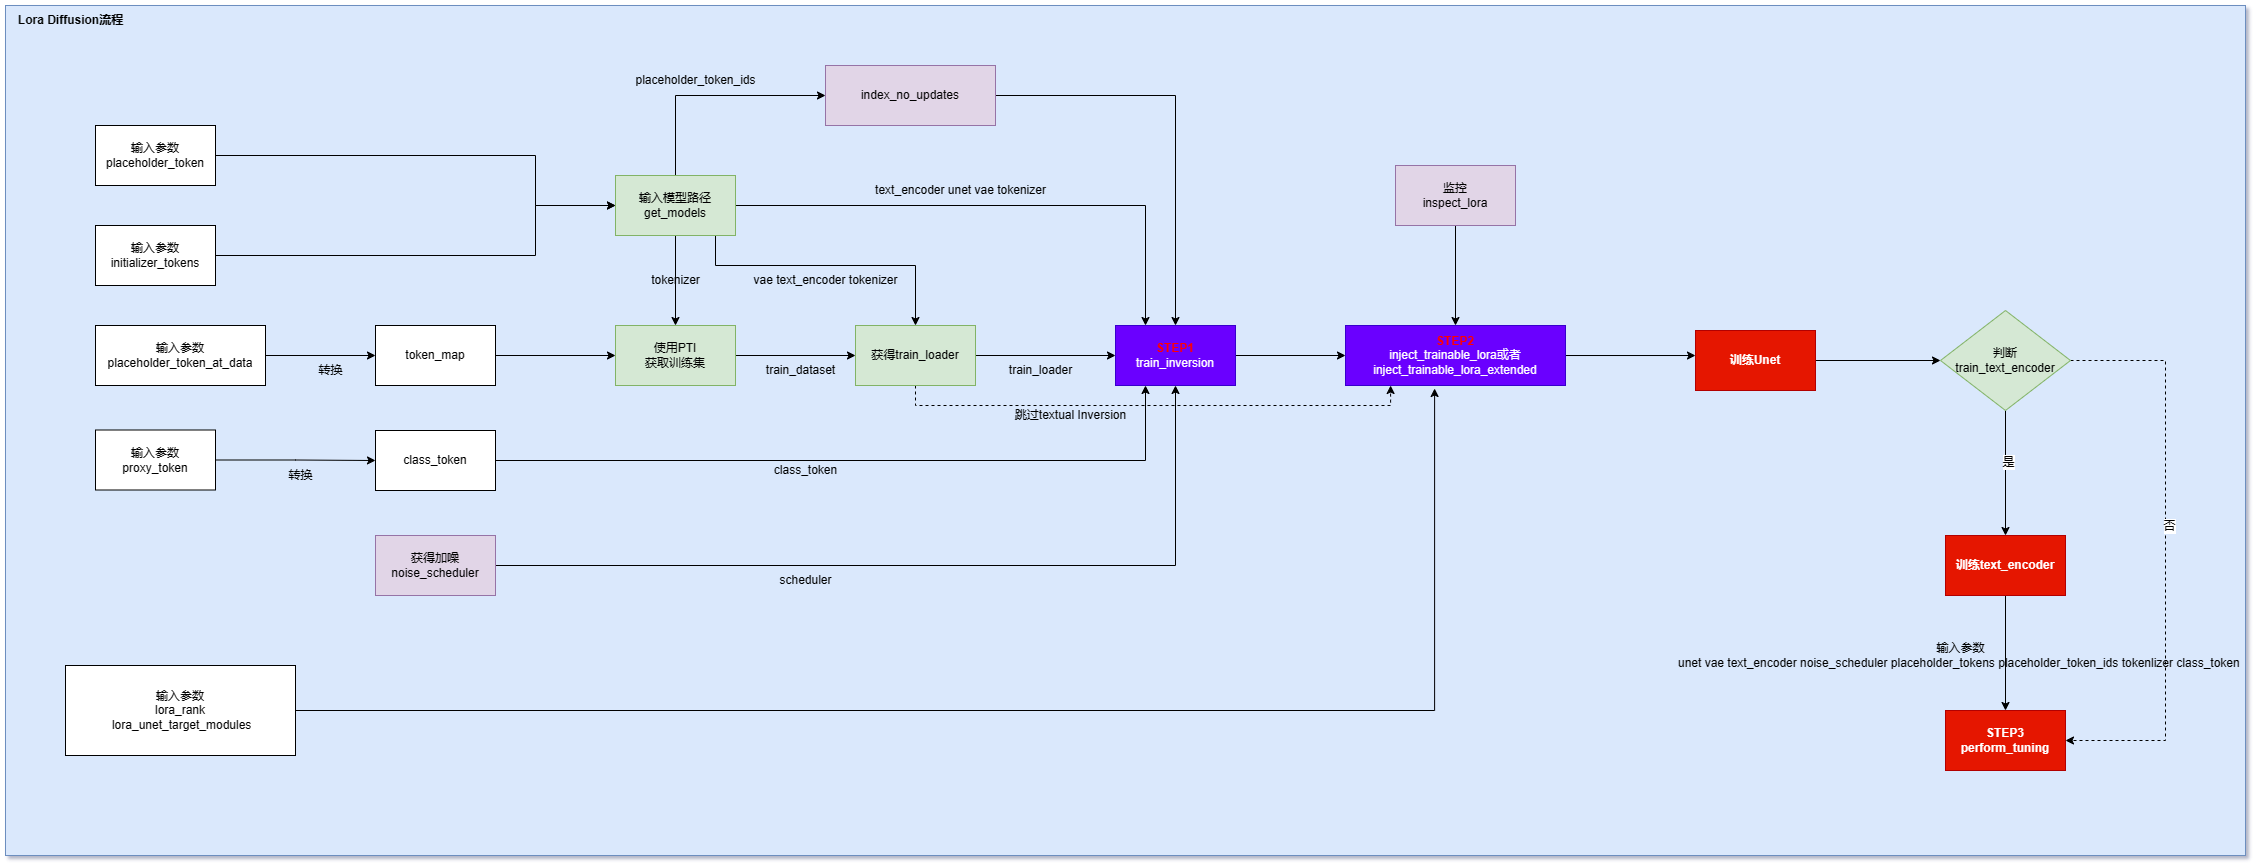
注意:Textual Inversion是在模型中找近似事物,有一定的“想象成分”,Dreambooth是直接插入新的事物。而Lora可以作用在两个算法上。
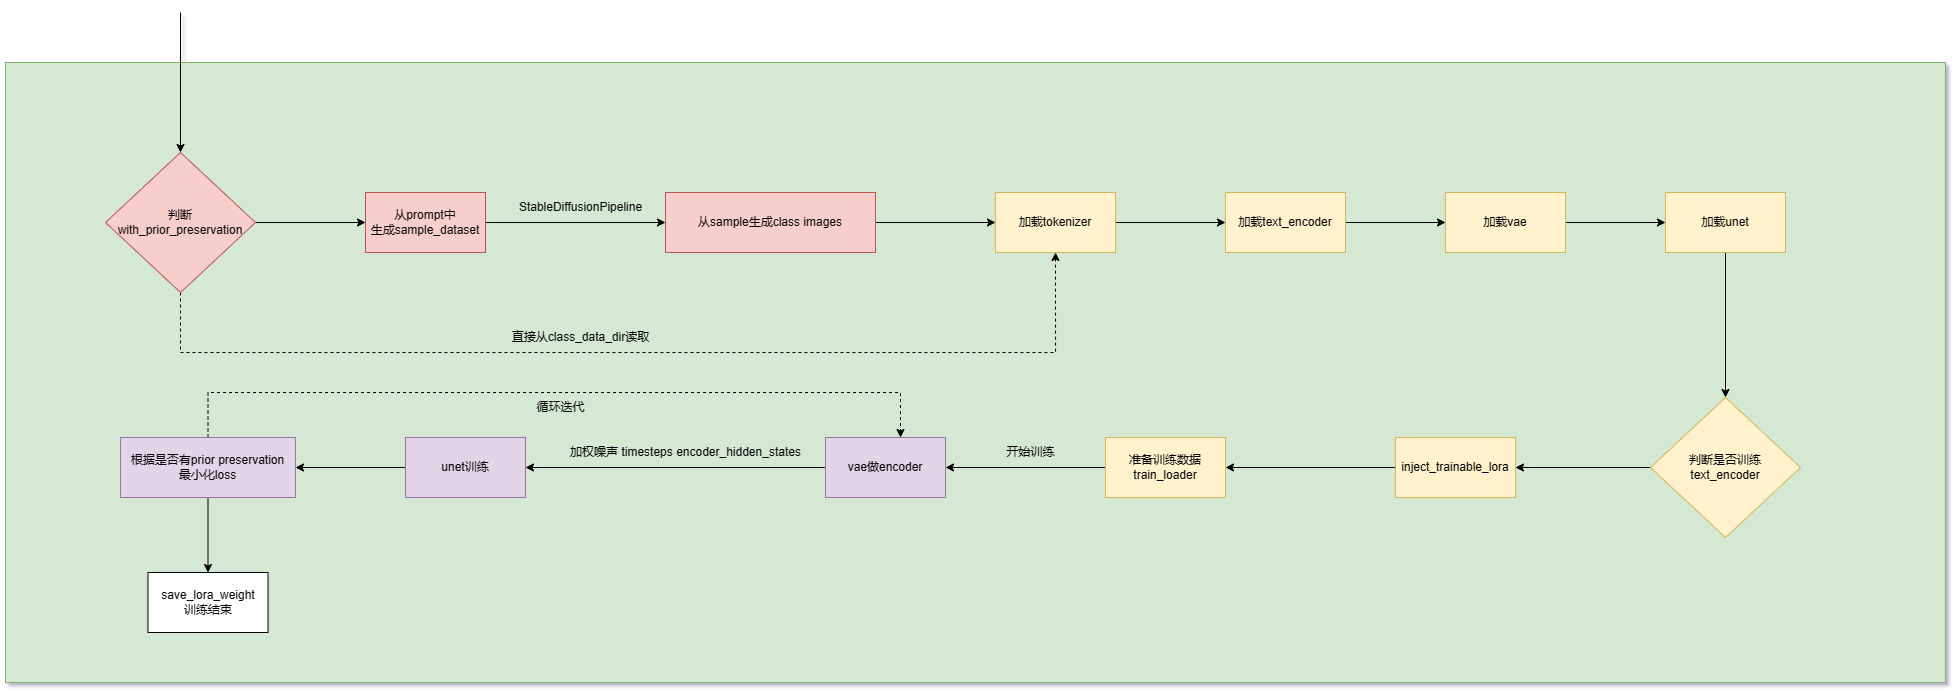
1.3 train_lora_dreambooth.py
此代码包含了dreambooth和LoRA算法。
1.4 LoRA核心代码块
from lora_diffusion import inject_trainable_lora, extract_lora_ups_down
...
unet = UNet2DConditionModel.from_pretrained(
    pretrained_model_name_or_path,
    subfolder="unet",
)
unet.requires_grad_(False)
unet_lora_params, train_names = inject_trainable_lora(unet)  # This will
# turn off all of the gradients of unet, except for the trainable LoRA params.
optimizer = optim.Adam(
    itertools.chain(*unet_lora_params, text_encoder.parameters()), lr=1e-4
)
四、diffusers库
huggingface社区的diffusers库中整合与封装了绝大部分跟stable diffusion相关的算法。其中就包括了lora for stable diffusion,几乎是照抄了大神cloneofsimo(GitHub – cloneofsimo/lora)的源码 。
4.1 diffusers自定义模型
diffusers库定义了自己模型标准,以LDM举例,不同于stable diffusion webUI的CKPT单文件格式,diffusers模型格式如下:
text_encoder目录:NLP模型,比如CLIP或者BERTtokenizer目录:跟text_encoder要匹配scheduler目录: 训练加噪算法模型unet目录: 生成latent representationvae目录: 把latent representations解码成图片
# 加载指定目录下的指定模型
vae = AutoencoderKL.from_pretrained("CompVis/stable-diffusion-v1-4", subfolder="vae")
4.2 训练dreambooth模型
# 训练dreambooth模型(不带prior-preservation)
export MODEL_NAME="CompVis/stable-diffusion-v1-4"
export INSTANCE_DIR="/disk2/Downloads/datasets/dreambooth/dog/"
export OUTPUT_DIR="/disk2/Downloads/datasets/dreambooth/"
accelerate launch train_dreambooth.py \
  --pretrained_model_name_or_path=$MODEL_NAME  \
  --instance_data_dir=$INSTANCE_DIR \
  --output_dir=$OUTPUT_DIR \
  --instance_prompt="a photo of sks dog" \
  --resolution=512 \
  --train_batch_size=1 \
  --gradient_accumulation_steps=2 --gradient_checkpointing \
  --use_8bit_adam \
  --learning_rate=5e-6 \
  --lr_scheduler="constant" \
  --lr_warmup_steps=0 \
  --max_train_steps=400
# 训练dreambooth模型(带prior-preservation)
export MODEL_NAME="CompVis/stable-diffusion-v1-4"
export INSTANCE_DIR="/disk2/Downloads/datasets/dreambooth/dog/"
export CLASS_DIR="/disk2/Downloads/datasets/dreambooth/dog_class/"
export OUTPUT_DIR="/disk2/Downloads/datasets/dreambooth/target/"
accelerate launch train_dreambooth.py \
  --pretrained_model_name_or_path=$MODEL_NAME  \
  --instance_data_dir=$INSTANCE_DIR \
  --class_data_dir=$CLASS_DIR \
  --output_dir=$OUTPUT_DIR \
  --with_prior_preservation --prior_loss_weight=1.0 \
  --instance_prompt="a photo of sks dog" \
  --class_prompt="a photo of dog" \
  --resolution=512 \
  --train_batch_size=1 \
  --gradient_accumulation_steps=2 --gradient_checkpointing \
  --use_8bit_adam \
  --learning_rate=5e-6 \
  --lr_scheduler="constant" \
  --lr_warmup_steps=0 \
  --max_train_steps=800
注意:参数–gradient_checkpointing 和 –use_8bit_adam把训练所需显存降低到了16Gb,GPU 100%(否则3090跑不起来这个模型)。RTX3090训练dreambooth大约需要17分钟(不包含生成100张class_image的5分钟)。
4.3 训练LoRA for DreamBooth模型
LoRA通过低秩(rank)矩阵 + 冻结预训练模型的方式,训练一个外挂的小模型,达到和上面方式类似的结果。
# 训练dreambooth lora模型(带prior-preservation)
export MODEL_NAME="CompVis/stable-diffusion-v1-4"
export INSTANCE_DIR="/disk2/Downloads/datasets/dreambooth_lora/dog/"
export CLASS_DIR="/disk2/Downloads/datasets/dreambooth_lora/dog_class/"
export OUTPUT_DIR="/disk2/Downloads/datasets/dreambooth_lora/target/"
accelerate launch train_dreambooth_lora.py \
  --pretrained_model_name_or_path=$MODEL_NAME  \
  --instance_data_dir=$INSTANCE_DIR \
  --class_data_dir=$CLASS_DIR \
  --output_dir=$OUTPUT_DIR \
  --with_prior_preservation --prior_loss_weight=1.0 \
  --instance_prompt="a photo of sks dog" \
  --class_prompt="a photo of dog" \
  --resolution=512 \
  --train_batch_size=1 \
  --gradient_accumulation_steps=2 --gradient_checkpointing \
  --learning_rate=1e-4 \
  --lr_scheduler="constant" \
  --lr_warmup_steps=0 \
  --max_train_steps=500
注意:调高了学习率;LoRA训练所需显存降低到了16Gb,使用参数–use_8bit_adam所需显存降低到了13G,GPU 30%~60%,训练速度提升了,模型也更小。RTX3090训练LoRA for dreambooth大约需要7分钟。
Lora for DreamBooth推理
# 推理inference
from diffusers import DiffusionPipeline, DPMSolverMultistepScheduler
import torch

pipe = DiffusionPipeline.from_pretrained("CompVis/stable-diffusion-v1-4", torch_dtype=torch.float16)
pipe.scheduler = DPMSolverMultistepScheduler.from_config(pipe.scheduler.config)
pipe.to("cuda")

pipe.unet.load_attn_procs("/home/ouyang/Downloads/datasets/dreambooth_lora/target/")

image = pipe("A picture of a sks dog in a bucket", num_inference_steps=25).images[0]

image.save("dog_in_bucket_lora_dreambooth.png")
4.4 训练Lora for DreamBooth Inpaint模型
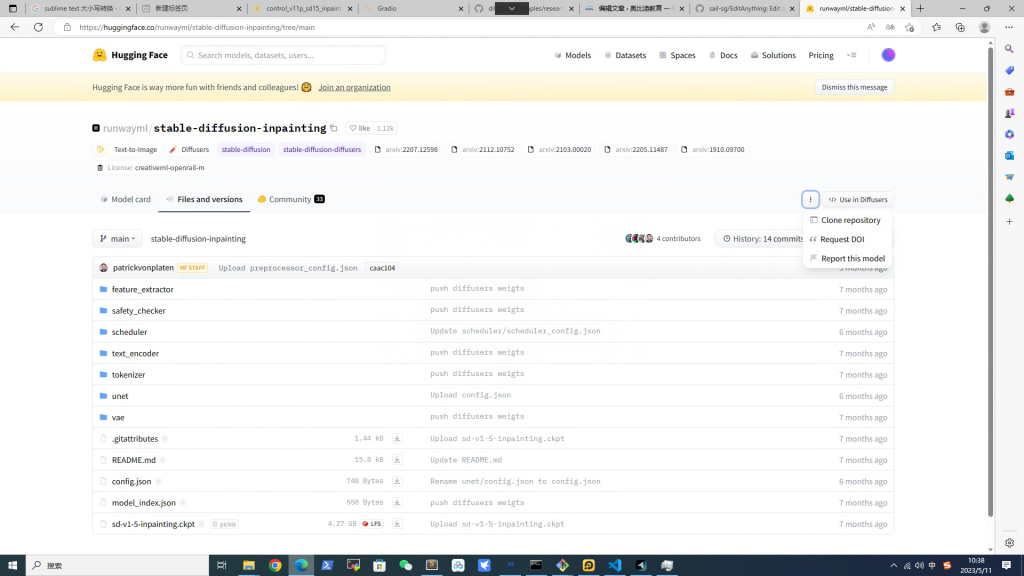
lora_dreambooth_inpaint训练脚本增加了inpaint能力,它的unet多了5个输入通道(4个通道是encoded masked-images,1个通道是mask自身),EditAnything项目依赖这个模型结合SAM+ControlNet算法做到了对局部进行编辑的SOTA效果。
下载SD_inpaint底模型
因为unet不同,所以底模型跟普通SD模型不同,点击下图所示clone repository用git lfs下载模型。这里的模型格式是diffusers格式。
五、电商项目开发
5.1 底模型
用脚本把CKPT模型转换成diffuser模型:
PS C:\AlexOuyang\app\diffusers\scripts> python .\convert_original_stable_diffusion_to_diffusers.py --from_safetensors --checkpoint_path="C:\AlexOuyang\app\SD\models\Stable-diffusion\chilloutmix_NiPrunedFp32Fix.safetensors" --dump_path='C:\AlexOuyang\app\can_remove\test_diffusers\diffusers_models\' --device='cuda:0'5.2 训练电商风格
5.3 过程点滴
依赖diffusers库,重构了train_dreambooth_lora.py。测试结果如下:
04/09/2023 11:53:02 - INFO - __main__ - ***** Running training *****
04/09/2023 11:53:02 - INFO - __main__ -   Num examples = 100
04/09/2023 11:53:02 - INFO - __main__ -   Num batches each epoch = 100
04/09/2023 11:53:02 - INFO - __main__ -   Num Epochs = 10
04/09/2023 11:53:02 - INFO - __main__ -   Instantaneous batch size per device = 1
04/09/2023 11:53:02 - INFO - __main__ -   Total train batch size (w. parallel, distributed & accumulation) = 2
04/09/2023 11:53:02 - INFO - __main__ -   Gradient Accumulation steps = 2
04/09/2023 11:53:02 - INFO - __main__ -   Total optimization steps = 500
Steps: 100%|██████████████████████████████████████████████████████████████████| 500/500 [08:43<00:00,  1.05s/it, loss=0.229, lr=0.0001]
Model weights saved in /disk2/Downloads/datasets/dreambooth_lora/target/pytorch_lora_weights.bin
附录
How does stable diffusion work
Textual Inversion vs DreamBooth优缺点
依赖库diffusers:封装了stability-ai和许多工具类的的集成tool,来自抱抱脸。
依赖库fire:将python程序转换为命令行程序的tool。
Q1: diffusers库运行报错:The installed version of bitsandbytes was compiled without GPU support.
A1: 自查方法:运行python -m bitsandbytes。需要安装和cuda版本匹配的bitsandbytes。例如:pip install bitsandbytes-cuda111