目录
可随意转载!Update 2023.10.15
一、 PyTorch使用指南
1. 版本选择
我们复现基于Pytorch代码的时候最好使用项目里面约定的版本。一般来说有三种约束:
- Pytorch的版本号
- 对应的cuda的版本号
- torchvision等Pytorch官方库
尤其是有自定义C++算子的代码复现,所有版本号必须匹配。可以下载Pytorch的extension-cpp项目来测试是否完美安装。
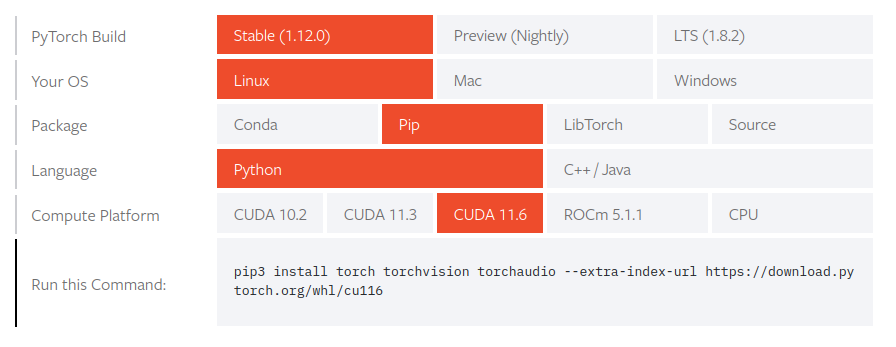
我们可以去官网查看版本号配对的安装包集合。
例子1:
# CUDA 11.1
# 注意"+cu111"也是版本号的一部分,它跟不带"+cu111"的同名包完全不兼容
pip install torch==1.10.0+cu111 torchvision==0.11.0+cu111 torchaudio==0.10.0 -f https://download.pytorch.org/whl/torch_stable.html
例子2:
因为网络慢的问题,我通常不会采用例子2的安装方法,我会单独下载torch本地安装(pip install xxx.whl),这个时候就要注意torchvision和torchaudio的版本号了。如果不加版本号,torch会默认cuda版本,它的查看方法是:
# 因为国内网络一般都比较慢,选择默认安装后发现cuda版本不匹配会比较耗时
# 建议指定torch版本和cuda版本做离线安装
import torch
print(torch.__version__)
print(torch.cuda.is_available())
print(torch.version.cuda)
默认安装下,Pytorch并不知道你本机的cuda版本,因此不一定兼容哦。
PyTorch官网镜像源会下线老版本,可以在仓库下载之后再安装。
2. 性能剖析Profiler
torch.autograd.profiler.xx 记录函数的性能:
>>> x = torch.randn((1, 1), requires_grad=True)
>>> with torch.autograd.profiler.profile() as prof:
...     y = x ** 2
...     with torch.autograd.profiler.record_function("label-z"): # label the block
...         z = y ** 3
...     y.backward()
...
>>> # NOTE: some columns were removed for brevity
>>> print(prof.key_averages().table(sort_by="self_cpu_time_total"))
-----------------------------------  ---------------  ---------------  ---------------
Name                                 Self CPU total %  CPU time avg     Number of Calls
-----------------------------------  ---------------  ---------------  ---------------
pow                                  60.77%           47.470us         3
mul                                  21.73%           25.465us         2
PowBackward0                         12.03%           121.891us        1
torch::autograd::AccumulateGrad      2.70%            6.324us          1
label-z                              2.13%            12.421us         1
torch::autograd::GraphRoot           0.64%            1.503us          1
-----------------------------------  ---------------  ---------------  ---------------
Self CPU time total: 234.344us
CUDA time total: 0.000us
二、Pytorch语言特性
1.初始化数组
>>> import torch as th
>>> a = th.ones(2,3)
>>> a
tensor([[1., 1., 1.],
        [1., 1., 1.]])
>>>
>>>
>>> b = 2*th.ones(5,3)
>>>
>>>
>>> d = th.arange(0,27,1)
>>> d
tensor([ 0,  1,  2,  3,  4,  5,  6,  7,  8,  9, 10, 11, 12, 13, 14, 15, 16, 17,
        18, 19, 20, 21, 22, 23, 24, 25, 26])
2.cat方法
拼接数组, 参数:待拼接数组,待拼接数组,拼接的目标维度
除了参数3之外的数组维度都必须相等。
>>> c = th.cat( (a,b), 0 )
>>>
>>> c
tensor([[1., 1., 1.],
        [1., 1., 1.],
        [2., 2., 2.],
        [2., 2., 2.],
        [2., 2., 2.],
        [2., 2., 2.],
        [2., 2., 2.]])
对应numpy.concatenate()
3. view方法
修改维度。类似numpy的reshape。
>>> d = th.ones(27)
>>> d
tensor([1., 1., 1., 1., 1., 1., 1., 1., 1., 1., 1., 1., 1., 1., 1., 1., 1., 1.,
        1., 1., 1., 1., 1., 1., 1., 1., 1.])
>>> d.view(3,3,3)
tensor([[[1., 1., 1.],
         [1., 1., 1.],
         [1., 1., 1.]],

        [[1., 1., 1.],
         [1., 1., 1.],
         [1., 1., 1.]],

        [[1., 1., 1.],
         [1., 1., 1.],
         [1., 1., 1.]]])
>>>
4.squeeze方法和unsqueeze方法
挤压和扩张,参数表示目标维度。参数不填表示自动寻找。无法挤压和扩张则保持不变。
>>> a = th.arange(6).view(2,3)
>>> a
tensor([[0, 1, 2],
        [3, 4, 5]])
>>> b = a.unsqueeze(0)
>>> b
tensor([[[0, 1, 2],
         [3, 4, 5]]])
>>> b.squeeze()
tensor([[0, 1, 2],
        [3, 4, 5]])
>>> unsqueeze在numpy里面叫expand_dims
5.expand方法
把单维扩展。本身不变
>>> a = th.arange(4).view(4,1)
>>> a
tensor([[0],
        [1],
        [2],
        [3]])
>>> a.expand(-1,4)
tensor([[0, 0, 0, 0],
        [1, 1, 1, 1],
        [2, 2, 2, 2],
        [3, 3, 3, 3]])
>>> a
tensor([[0],
        [1],
        [2],
        [3]])
>>>
>>> a.expand(4,4,4)
tensor([[[0, 0, 0, 0],
[1, 1, 1, 1],
[2, 2, 2, 2],
[3, 3, 3, 3]],
[[0, 0, 0, 0],
[1, 1, 1, 1],
[2, 2, 2, 2],
[3, 3, 3, 3]],
[[0, 0, 0, 0],
[1, 1, 1, 1],
[2, 2, 2, 2],
[3, 3, 3, 3]],
[[0, 0, 0, 0],
[1, 1, 1, 1],
[2, 2, 2, 2],
[3, 3, 3, 3]]])
对应numpy叫np.broadcast_to
6. 高级索引(slice)
>>> x
array([[ 0,  1,  2],
       [ 3,  4,  5],
       [ 6,  7,  8],
       [ 9, 10, 11]])
>>> rows = np.array([[0,1],[3,3]])
>>> cols = np.array([[0,2],[0,2]])
>>> y = x[rows,cols]
>>> y
array([[ 0,  5],
       [ 9, 11]])
7. zip 方法
把数组组合成元组(tuple)
x = [1,2,3,4,5]
y = ['a','b','c','d']
xy = zip(x,y)
print xy
[(1, 'a'), (2, 'b'), (3, 'c'), (4, 'd')]